Kids bedrooms are a space where imagination and creativity must be the main elements. Decorating them can be all an adventure in order to achieve a fun and beautiful decoration that children love. Colours are never too cheerful and originality should be always part of the decoration. This is the case of this lovely wall coat hanger for kids that we want to share with you today. A wall coat hanger inspired in the animal world that you can do it yourself.
 Source: Recycrafts
Among the many ways we can think about for recycling an old wood board, this is one of the most fun we’ve seen to the moment. It’s a simple idea but quite lovely too. It’s from the magazine Recycrafts and it’s as simple as painting a wood board for creating a wall coat hanger for kids with animal designs.
 Source: Recycrafts
They’ve used four different animals’ backs, a tiger, an elephant, a lion and a zebra, and they’ve used the hooks as their tails.
A DIY wall coat hanger for kids
 Source: Recycrafts
This DIY project may seem complicated, specially the task of painting the animals, but it’s quite easy to do. The secret is using the stencilled sketch technique which consist in creating different drawings or motifs with templates for stencilling. It’s quite easy, you’ll see!
Another good feature of this original project is that you won’t need a lot of materials or complex tools. You can plan this craft easily and make it during your leisure time.
List of materials
 Source: Recycrafts
- A 52 x 12 cm wood board (This is the size they’ve chosen in Recycrafts, but you can do it as big or small as you want. The point is recycling an old one if you have it.).
- Light grey acrylic paint for the base.
- Acrylic paint for the animals: orange, white, black, grey, yellow and brown.
- 4 hooks (one for each of the animals you make, you can paint them if you can’t find the right colour for each one).
- Screws for attaching the hooks.
- Acetate sheets for the animals templates for stencilling.
- A cutter and scissors.
- A permanent marker.
- A paintbrush.
- A brush for stencilling (with short and hard bristles).
- Masking tape.
- A screwdriver.
Let’s start creating the wall coat hanger for kids
 Source: Recycrafts
1.- Painting the base
The first step is paint the wood board with the light grey acrylic paint you’ve chosen. Remember to paint it following the grains’ direction and with long brush-strokes so that they are imperceptible. Apply a second layer when the first one is dry.
2.- Create the animals templates for stencilling
Use the acetate sheets and the permanent marker for creating the animals templates for stencilling. You can find the designs in the web of Recycrafts. Print them and copy them on the acetate sheets with the permanent marker. Then, cut them with the cutter and you’ll have the templates. Hold them to the wood board with masking tape.
 Source: Recycrafts
3.- Painting the animals shapes
Start painting the animals using the stencilling brush and the acrylic paint. The key for a perfect result is not soaking too much the paintbrush and tapping small areas with it until they’re well covered. Then, leave it dry.
 Source: Recycrafts
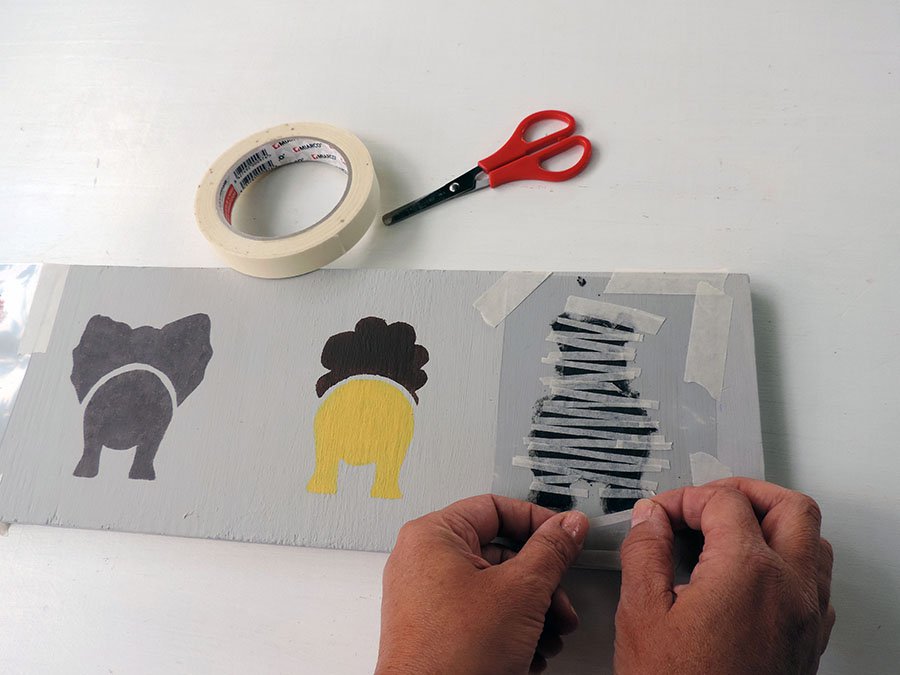
4.- Create the small details
When it’s dry, use the masking tape for marking the stripes on the tiger. The uncovered zones will be covered with white paint.
 Source: Recycrafts
5.- Paint the white stripes of the tiger
With the stencilling brush and the white acrylic paint, paint the white stripes. When it’s dry, remove the masking tape and use the masking tape again and repeat the process for painting the black stripes.
 Source: Recycrafts
You’ll have to do the same with the zebra in order to create his beautiful white stripes.
 Source: Recycrafts
Use a smaller paintbrush for doing the stripes if you want, since the details are too small.
 Source: Recycrafts
7.- Time of turning on the screwdriver
Finally, when everything is well dry, you can screw the hooks that will simulate the tails of the animals.
 Source: Recycrafts
When you’ve completed all the steps, your DIY wall coat hanger for kids will be ready for hanging it in your children’s bedroom. It will be a fun and practical decorative element.
Via Recycrafts and decoración 2.0